Guided Access for iPads - Often Overlooked but Highly Effective
Inside: How to use Guided Access to keep it locked into one app, set time limits, and eliminate touch features to ensure students, children, and family members are where you want them to be.
You take a deep breath and think about everything on your iPad as you hand it over to the child standing in front of you.
The dread starts to set in the minute that their eyes light up.
You have the best intentions. That new learning app is awesome; you know it will be great for practicing math facts. In fact, one of the child’s teachers even recommended it.
But you also know—without a doubt—that the lure of YouTube and other shiny apps is sure to draw the child away from the app you currently have on the screen.
And that may be the most obvious temptation.
Less likely, but more unfortunate consequences include the child
adjusting your settings
changing your passcode
deleting your contacts
reading your email.
Is that a cold sweat you feel dripping down your back?
You quickly change your mind, grab the iPad, and—amid loud complaints from the child—try to distract them with a different activity.
If only there was an easy way to guarantee that a child, friend, family member, student, or client would only use an iPad or iPhone for exactly what you intended it to be used for.
Good news- There is.
And it doesn’t even require a fancy addition or advanced coding.
It is built right into the device.
Table of Contents
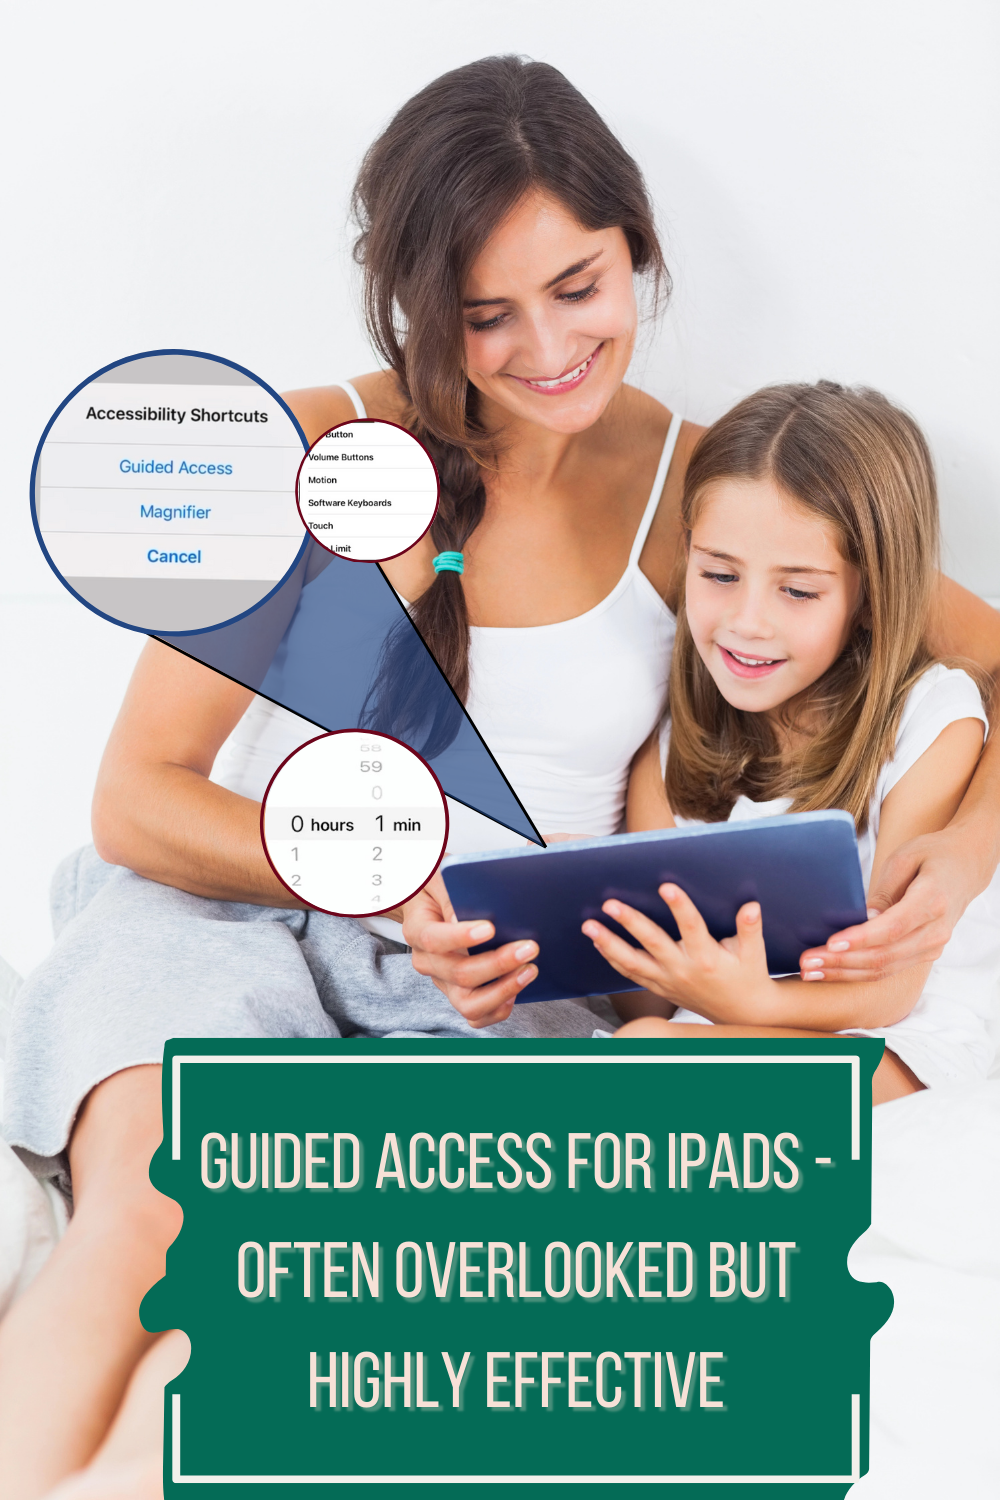
The Magic of Guided Access
Guided Access is a built-in feature in iOS and iPadOS.
This feature allows you to lock a user into a specific app. If you hand your phone or iPad to a student or another user, they cannot leave that app and access other things on your device.
You can also use this feature to set time limits for how long someone can use your device or even to set areas of the screen that an individual can't touch.
For example, if you want to use your iPad or iPhone to show a video but don't want somebody to leave that video, you can turn off the touchscreen. With the touchscreen off, that individual will not be able to use the touchscreen to exit that app.
Setting up Guided Access
To use Guided Access, you are going to go to:
Settings
Accessibility
General
Guided Access
Once you are in the Guided Access menu, you will see a toggle button at the top that you can tap to turn the Guided Access feature on and off.
Guided Access Options
Passcode
Once you have Guided Access on, you have more options. You can go into passcode settings, and here, you can choose to let your tablet leave guided access with facial ID or not.
You can also set up a guided access passcode, a four-digit number you must enter to leave Guided Access.
When using this feature in a situation where you will need to share the passcode with others, I recommend creating a standard passcode system.
One that has worked well for me is using the first four letters of a pet’s name and their number equivalent on a keypad. This allows you to share the password with others without giving it away to everyone. For example, when I was in the classroom, we would ask which of our pets was the coolest, best, naughtiest, etc. Whatever name I answered, everyone knew that the first four letters of that name was the current password. This allows for frequent changing of the password without anyone getting locked out.
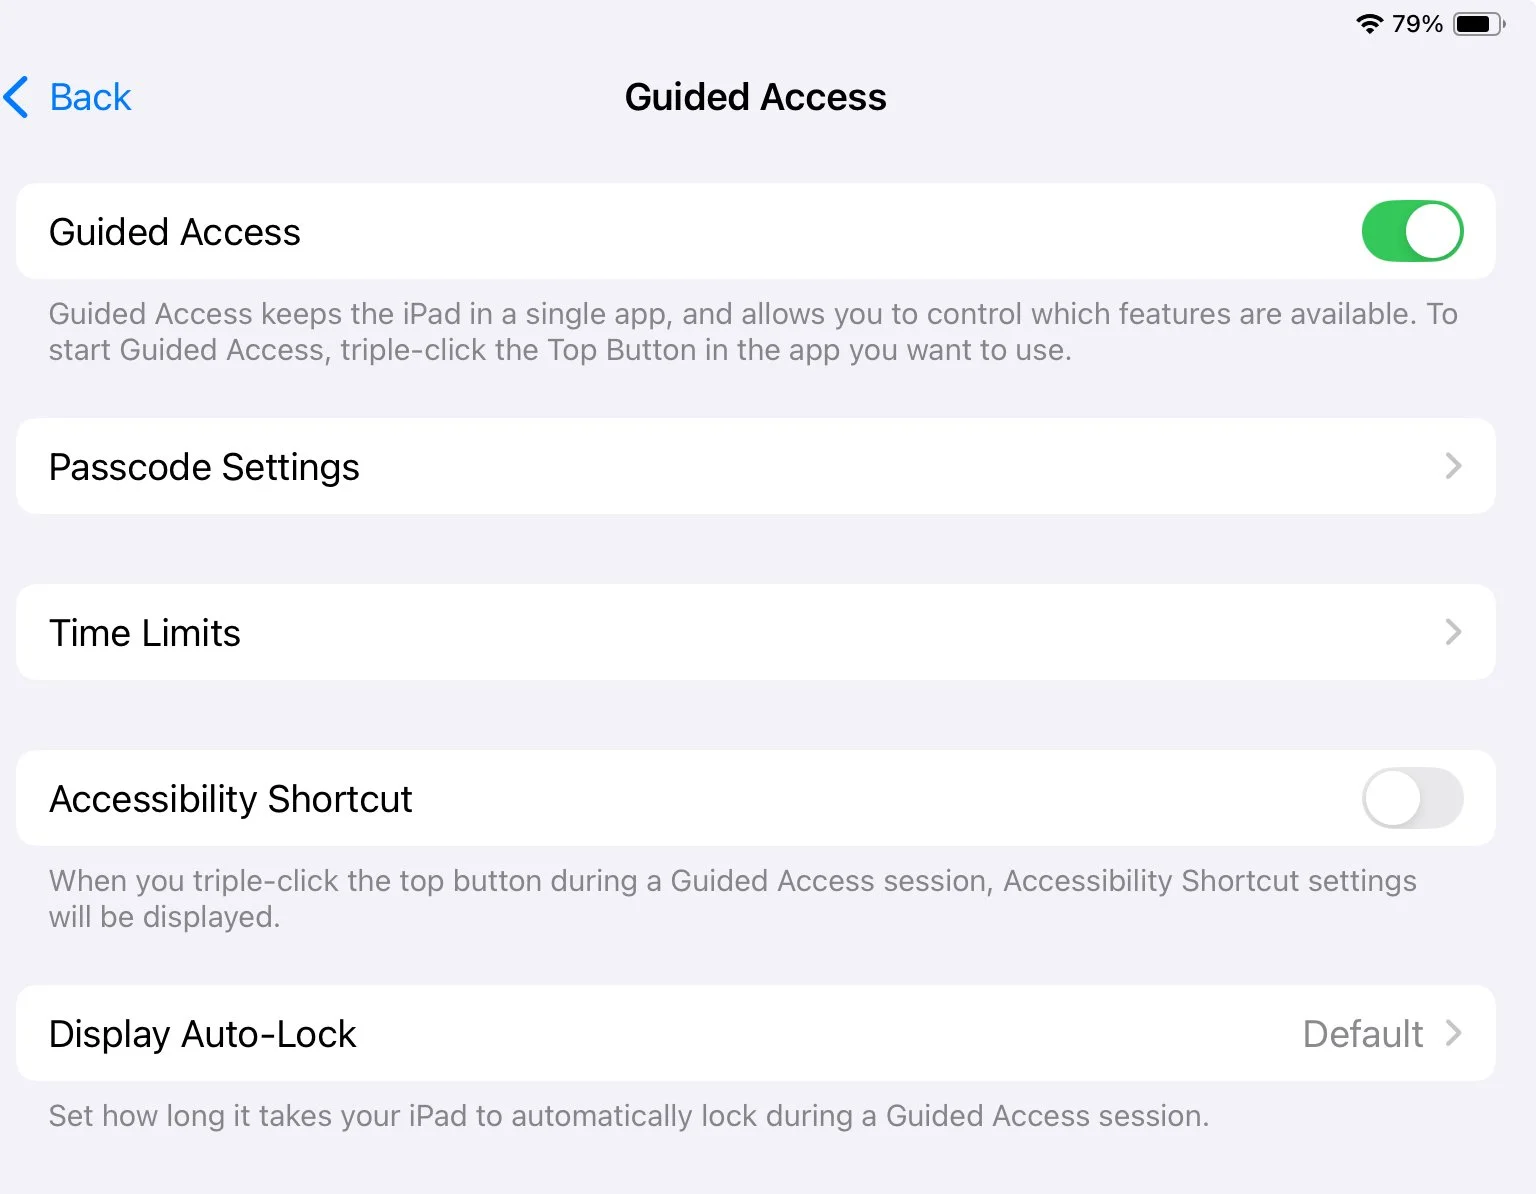
Time Limits
In the Guided Access menu, you can customize time limit settings.
Select an auditory alarm that goes off when the time runs out
Select to have it speak the amount of time left so someone knows that the time is ending
Allow Accessibility Features
Turning on the accessibility settings allows users to access additional accessibility shortcuts while in Guided Access. This means that even if the device is in Guided Access when the home button is triple-clicked three times, the accessibility shortcuts menu will come up.
Auto Lock
Auto lock changes how long your iPad or iPhone screen is on before it sleeps and locks.
If it is left on default, it will lock the screen at the default time you have sent for your screen to lock.
However, you can choose a custom time length for when the device is in Guided Access. This can be important to adjust if you are using the device as a communication app or for other uses where the user needs to have access to the device for a long period of time but may not constantly interact with the screen.
Using Guided Access
Once Guided Access is set up and turned on in the settings menu, it is ready to use whenever you need it.
To use Guided Access:
If you have a home button, triple-click or push the home button three times in a row. This must be done semi-quickly, so it can take a little practice.
If you do not have a home button, you will push the main power button three times, again, semi-quickly.
If you have multiple accessibility shortcuts, you will see a menu that shows all of the shortcuts you have enabled and can pick Guided Access. If you do not have any additional accessibility shortcuts, the devices will automatically go into Guided Access mode.
In Guided Access Mode:
Once the device is in Guided Access mode, you can use it like normal (based on the settings you set earlier), but when you try to leave the app, you will receive a message that says it is in Guided Access.
To Leave Guided Access:
Push the home or power buttons three times to get out of Guided Access. The device will then ask for your passcode. Once that passcode is entered, you will be brought to the Guided Access menu.
Guided Access Menu
Ending or Resuming:
In the Guided Access menu, you can choose to leave or end Guided Access by choosing “end” in the upper left.
You can also resume Guided Access using the “resume” option in the upper right.
Changing Options in Guided Access:
On the bottom of the Guided Access menu, there is a place to access “options.” Here, you can modify how Guided Access works by tapping the toggle button to turn features on or off.
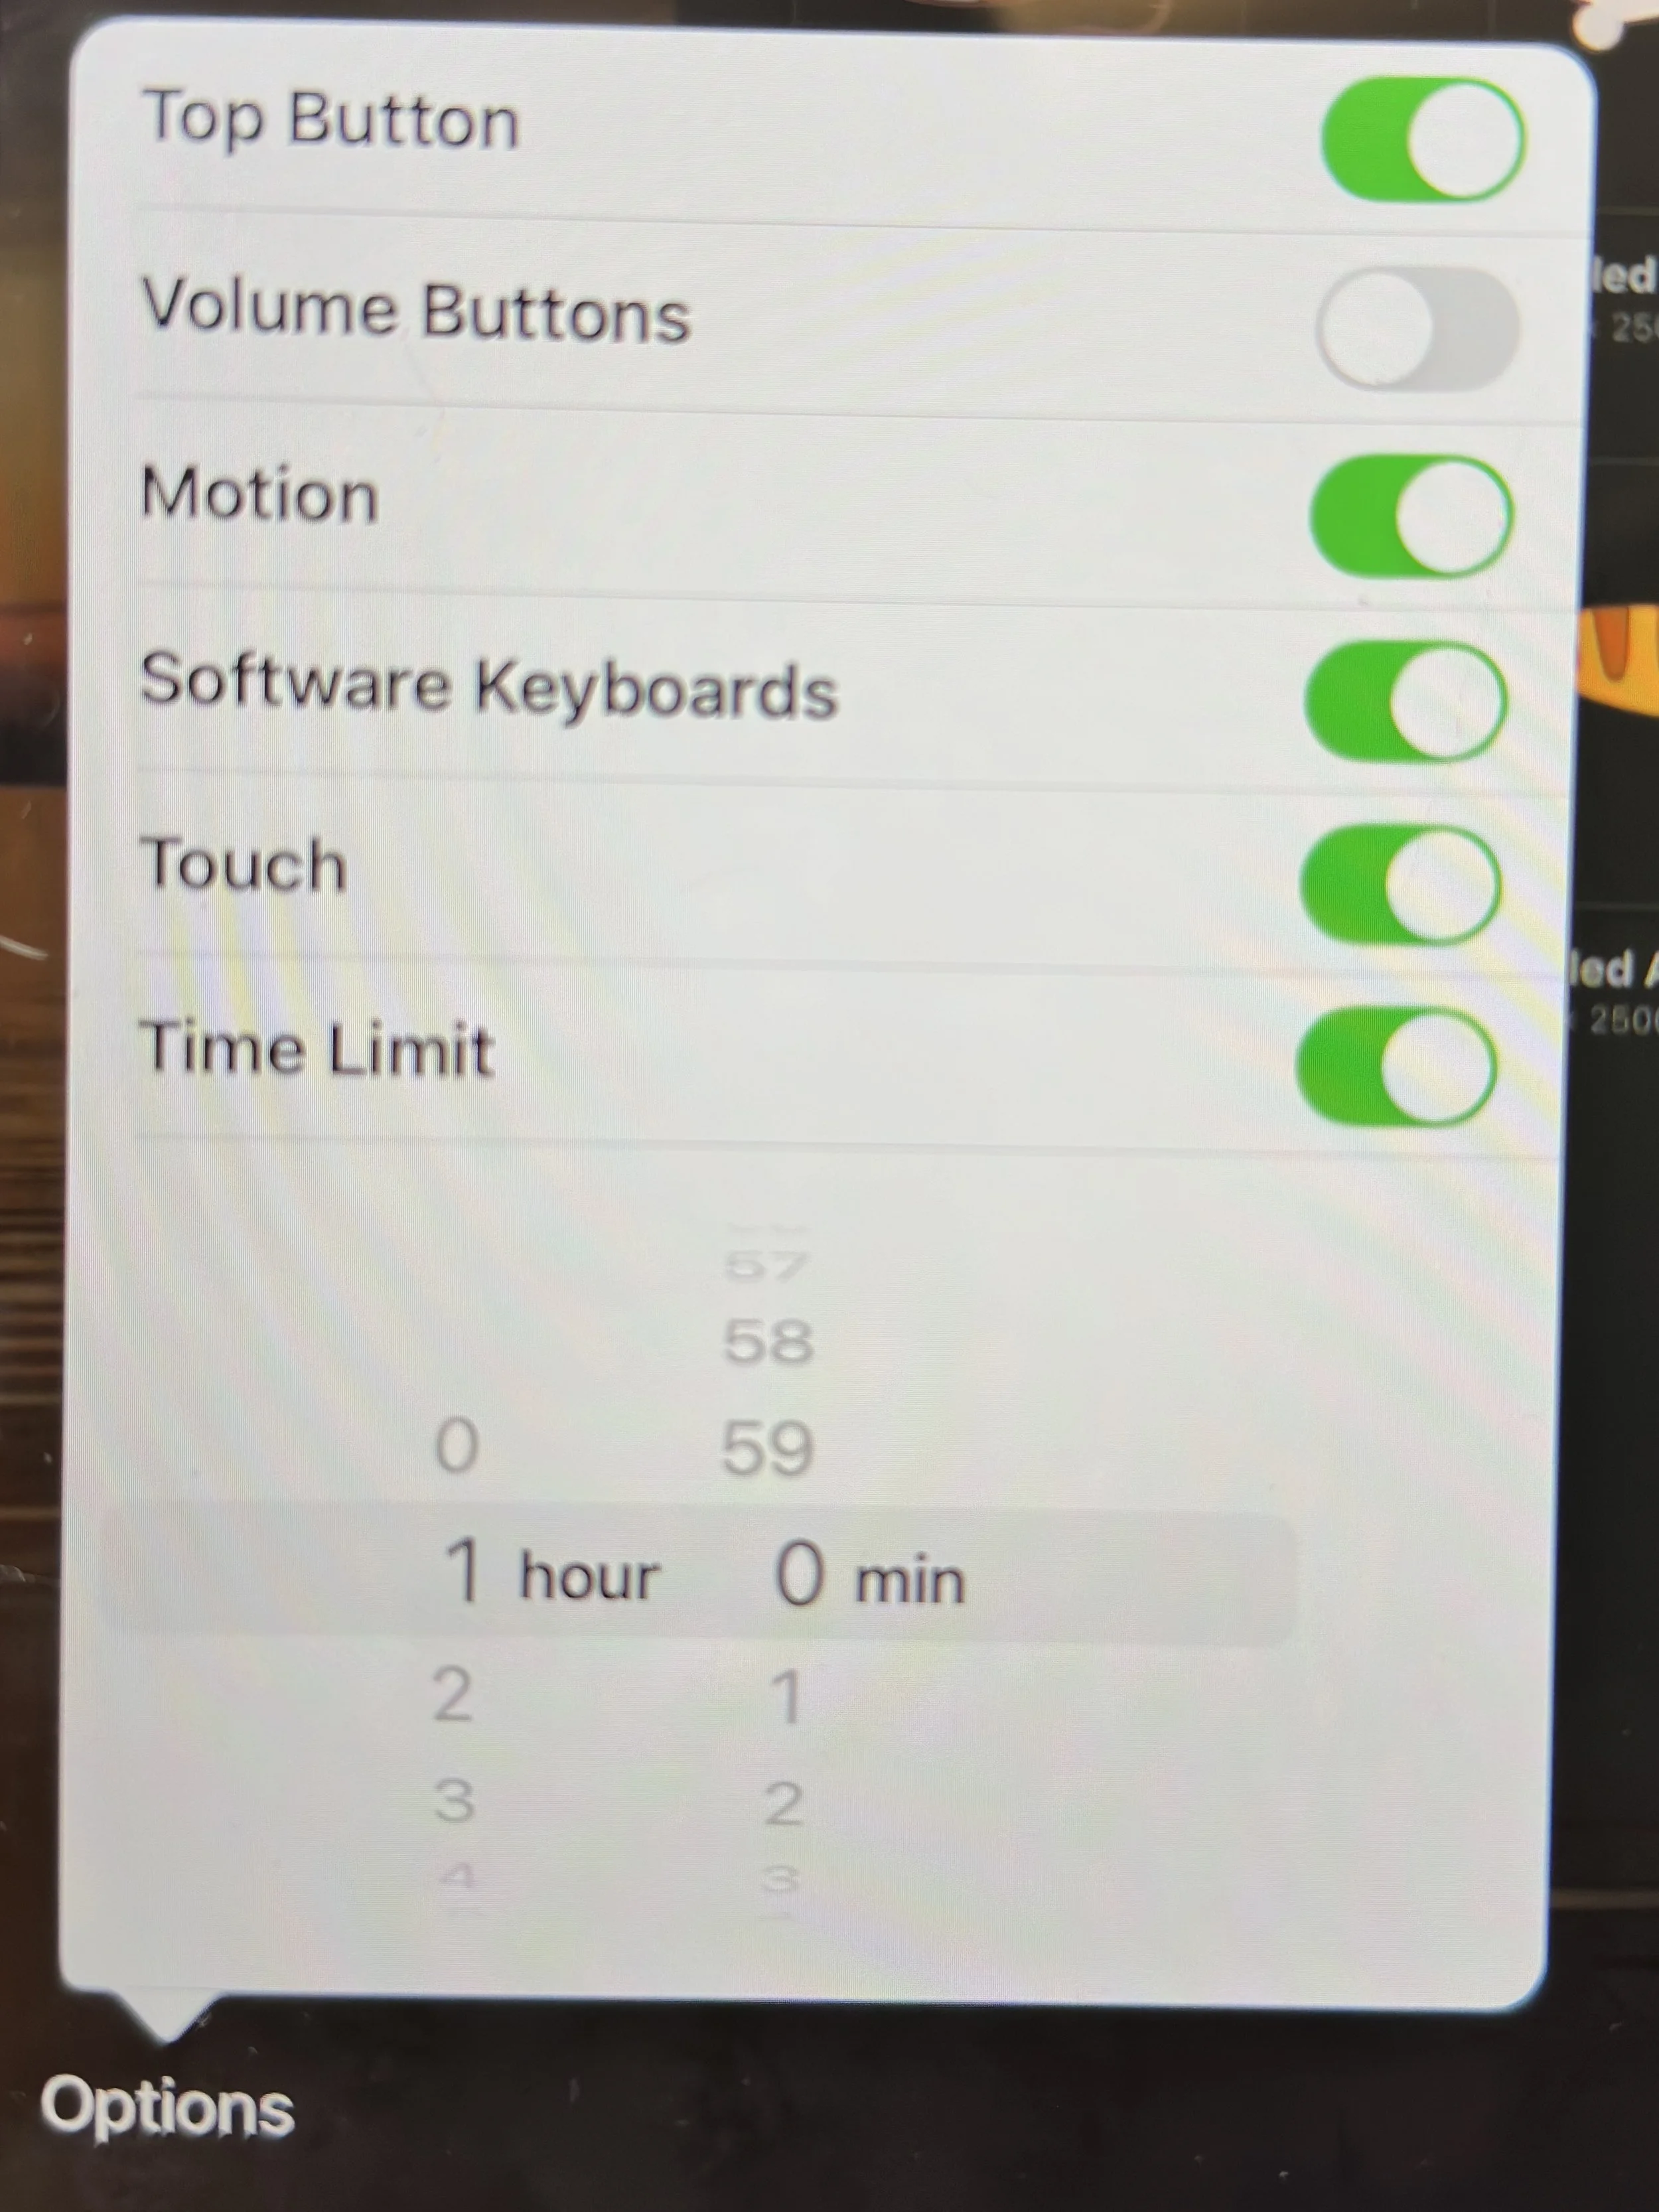
Top Button- choose to allow or not allow the sleep/wake button
Volume Buttons- allow or disallow the use of volume buttons. This can be really handy if you are allowing someone to use an iPad in a quiet setting and you don't want them to accidentally or intentionally turn the volume up on an app, such as listening to a video, etc.
Motion- choose to allow or disallow the use of motion. This will determine if the screen will rotate and also affect certain apps and games that rely on tilting the iPad/iPhone for play.
Software Keyboards- allow or disallow the use of on-screen keyboards.
Touch- allow or disallow the use of touch on the entire screen. If this is turned off, the user cannot interact with the touch screen at all, and the device basically becomes a view-only device. This can be useful if you are using the device to allow someone to watch a video but you do not want them to skip ahead in the video.
Time Limit- This option allows you to set a time limit for how long the iPad is going to work before it locks. For example, I can set it for the length of one video, and at the end of that time, the iPad locks. This is different than when the screen times out because when the screen times out, you can put in your normal iPad password to turn the screen back on. With Guided Access enabled, it will only unlock with the unique guided access passcode.
Eliminating Touch in Specific Areas
At the bottom, you'll also see an option that says, “Circle areas on the screen you would like to disable.” This allows you to circle specific areas of the screen that will not work with touch when Guided Access is on.
One example of a time when this may be useful is using a drawing app. You may want to allow someone to draw, but you don't want them to open up another canvas. You won’t want to completely disable touch because then the user cannot draw at all. Instead, you can draw a circle around the area that opens a new canvas. When you do this, you will see a grey box over the area you circled, showing that touch will be disabled in this area.
Always Waiting
One of the great things about Guided Access is that once you have it set up in Accessibility settings, it is always ready and waiting for you to use. Simply triple-click the home or power button, and you are ready to go.
It is just that simple. Once it is set up, you can triple-click to start it or triple-click and put in your password to end it.
Peace of Mind
The next time you want to have a student, client, friend, or family member use your device for a specific purpose but are hesitant about all of the things they may accidentally (or intentionally) edit, see, or use, try out Guided Access and hand the device over with confidence, knowing it will only be used for exactly what you meant it to.
Frequently Asked Questions (FAQ):
What if I forget my Guided Access passcode?
If you forget your passcode, you may need to restart your iPad or use recovery mode to regain access.
Can I set different passcodes for different apps?
No, Guided Access uses a single passcode for all sessions.
Is Guided Access available on all iPad models?
Guided Access is available on iPads running iOS 6 or later.
Can I use Guided Access to limit screen time?
While Guided Access can set time limits for sessions, it's not a comprehensive screen time management tool.
Does Guided Access affect notifications?
Notifications will still appear unless you disable them in your device's settings.
Can I use Guided Access on any app?
Yes, Guided Access can be used with any app installed on your iPad.